ETL
Udemy - Writing production-ready ETL pipelines in Python / Pandas
Contents
- Introduction
- Quick and Dirty Solution
- Functional Approach
- Object Oriented Approach
- Setup and Class Frame Implementation
- Code Implementation
- Finalizing the ETL Job
- Summary
1. Introduction
You will learn:
- Each step of the ETL pipeline in Python from scratch to Production
- How to use the necessary tools and packages (6)
- Python 3.9
- Jupyter Notebook
- Git/GitHub
- VSCode
- Docker/Docker Hub
- Python pacakges (9): pandas, boto3, pyyaml, awscli, jupyter, pylint, moto, coverage, memory-profiler
- How to apply functional and object-oriented programming
- How to do a proper code design
- How to use a meta file for job control
- Best practices in developing Python code (13):
- Design Principles
- Clean Coding
- Virtual Environments
- Project/Folder Setup
- Configuration
- Logging
- Exception Handling
- Linting
- Dependency Management
- Performance Tuning with Profiling
- Unit testing
- Integration Testing
- Dockerization
Task Description
| Source Data | Target Data |
|---|---|
 | 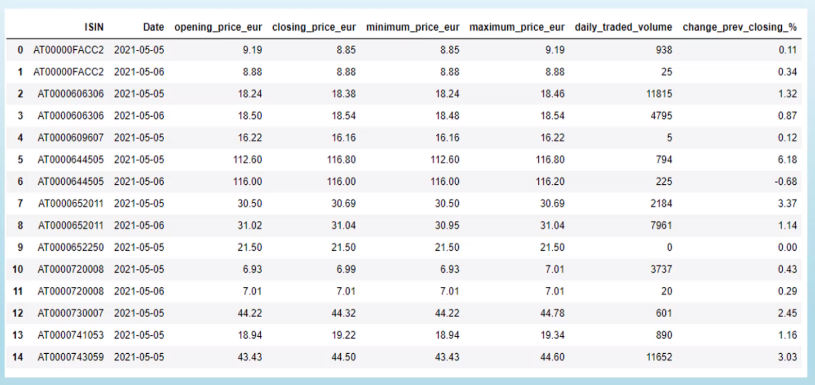 |
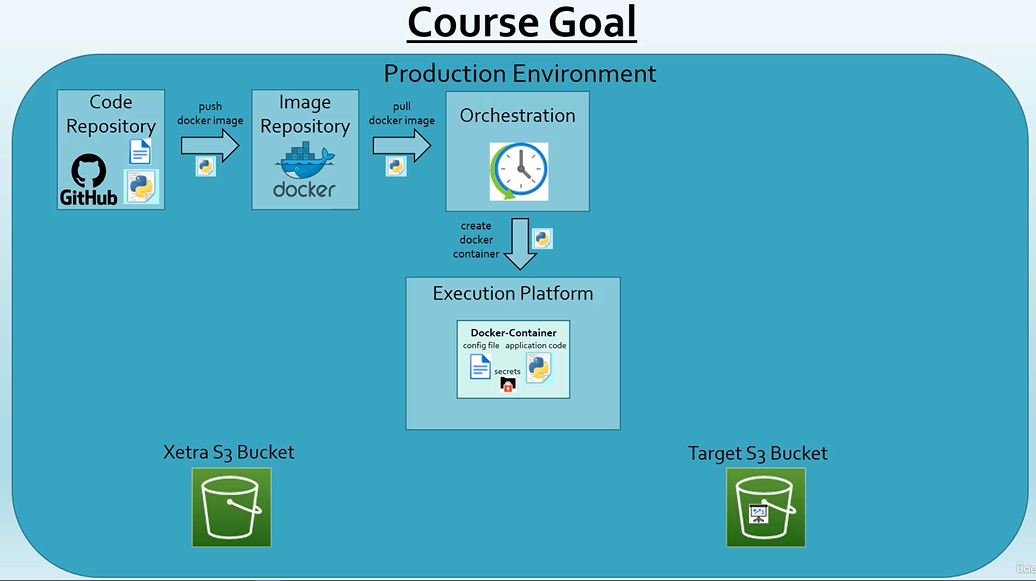
We want a weekly ETL job that grabs data from the Xetra S3 bucket since the last run of the job and saves the report to a target S3 bucket.
Requirements
- Target format parquet
- First data of the report should be given as input
- Auto-detection of the source files to be processed
- Configurable production-ready Python job
Production Environment
Task Steps
- Set up a virtual environment
- Set up AWS
- Understanding the source data using Jupyter Notebook
- Quick and dirty solution using Jupyter Notebook
- Functional vs OOP
- Importance of testing
- Functional approach with the quick and dirty solution
- OOP Design Principles and further requirements - configuration, logging, metadata
- OOP Code Design
- Set up development environment (Github, Python project, VSCode)
- Implement Class Frame
- Implement Logging
- Coding (Clean Code, functionality, linting, unit tests, integration tests)
- Setup dependency management with pipenv
- Performance tuning with profiling and timing
- Create Dockerfile + push docker image to Docker Hub
- Run application in production using Minikube and argo workflows
2. Quick and Dirty Solution
Why use a virtual environment?
Makes it easy to switch between projects without uninstalling and reinstalling packages.
There’s no limit to the number of environments we can create.
Standard library for virtual environments
- pyenv (upto python 3.5)
- venv (python 3.6+) Third party libraries
- virtualenv
- pyenv
- pyenv-virtualenv
- virtualenvwrapper
- pyenv-virtualenvwrapper
- pipenv
Use pipenv while developing Python applications and not libraries or packages.
We’ll use pipenv because
- it’s recommended by Python.org for application dependency management.
- Combines pip and virtualenv in one tool.
- Replaces requirements.txt and solves issues that occur while using requirements.txt and multiple environments.
Virtual Environment Setup
Install pipenv in our system-wide python installation using
pip install pipenv
Create a folder for this project and cd into it
Create a virtual environment using the command
pipenv shell
This should create and activate a virtual environment.
To install packages inside this environment, install them using pipenv install <PACKAGE_NAME>
To see what packages have been installed in this environment, run pip list
pipenv uses Pipfile instead of requirements.txt. If requirements.txt is found, pipenv will convert it to a Pipfile.
To see the location where the virtual environment was created, run the command pipenv --venv
To deactivate the environment, simply exit the shell using the exit command.
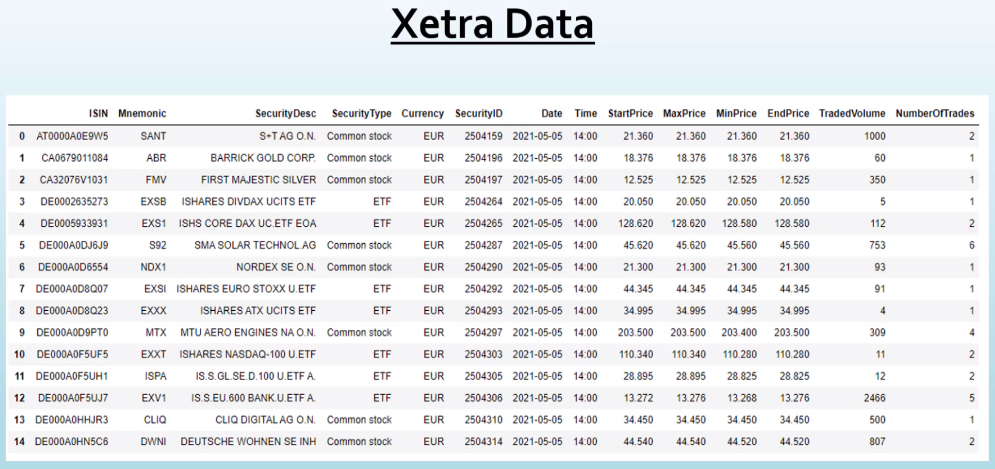
Read a CSV file from AWS S3
from io import StringIO

import boto3
import pandas as pd

# get all objects from bucket for date 2022-01-28
s3 = boto3.resource('s3')
bucket = s3.Bucket('xetra-1234')
bucket_objects = bucket.objects.filter(Prefix="2022-01-28/")

# convert to list
objects = list(bucket_objects)

# read one of the csv objects and convert to it to a dataframe
csv_obj = bucket.Object(key="2022-01-28/2022-01-28_BINS_XETR15.csv").get().get("Body").read().decode('UTF-8')
data = StringIO(csv_obj)
df = pd.read_csv(data, sep=",")
Access all data from S3 for a particular day
from io import StringIO
from rich.progress import track

import boto3
import pandas as pd

# Get all objects from bucket for date 2022-01-28
s3 = boto3.resource('s3')
bucket = s3.Bucket('xetra-1234')
bucket_objects = bucket.objects.filter(Prefix='2022-01-28/')

objects = list(bucket_objects)

# Create a dataframe with all data for a single day
df_all = pd.DataFrame()
for obj in track(objects, description="Appending to dataframe ..."):
    csv_obj = bucket.Object(key=obj.key).get().get("Body").read().decode("UTF-8")
    data = StringIO(csv_obj)
    df = pd.read_csv(data, sep=",")
    df_all = df_all.append(df, ignore_index=True)

# Keep only columns we're interested in
columns_of_interest = ['ISIN', 'Date', 'StartPrice', 'EndPrice', 'MinPrice', 'MaxPrice', 'TradedVolume']
df_all = df_all.loc[:, columns_of_interest]

# Drop any rows with missing values
df_all = df_all.dropna()